On this page
The goal of this article is to provide a clear step-by-step guide starting from the fundamentals for deploying a Streamlit app on an AWS EC2 Instance and use your own domain name as well.
So this guide will not only help you if you’re a beginner in AWS but also in deploying Streamlit apps.
In this article I’ll deploy my inflacon project on my domaine inflacon.com.
Though in this article we’ll go from having nothing, not even an AWS account to accessing your app using a domain name, this article is not intended to be a course on the basics of AWS that we’ll be using, on Streamlit, or any other stuff we’ll be using.
So, I’ll provide high level explanations that will help you if you’re a complete beginner but I’ll not get into details.
I’ll also not get into setting up SSL certificates or how to use them, I just bought the domain name from Cloudflare and will use what it provides. But if you want to set your own SSL certificates, look for certbot. It should be relatively easy to add that part to what this article provides.
TL;DR
To access your app on <ec2-instance-public-ip-address>:8501:
- Security groups:
- Inbound traffic:
- SSH from anywhere
- 8501 from anywhere
- Outbound traffic:
- All traffic to anywhere
- Inbound traffic:
- User data: Script
- Install / updates some dependencies and packages (git, python, etc.)
- Create a user
- Install others stuff (for me it’s going to be the
uvpackage manager for me) - Clone the repo
- Do other stuff (create the virtual environment, install project dependencies etc.)
- Install others stuff (for me it’s going to be the
- Configure your app a
systemdservice. - Restart systemd, enable your service, start it.
To access your app on your own domain name:
- Buy a domain name
- Configure DNS records
- Configure SSL certificates
- Install and configure
nginxand take into account how you handle the SSL certificates - Modify the Streamlit app to work on local host,
nginxwill forward the HTTP requests to it - Modify the Security Group: remove the incoming traffic rule on 8501 and add HTTP and HTTPS
AWS Root Account, IAM, Billing
Root Account, IAM User, Group, Policy
First, you have to sign up to AWS, that will be your root account. One of AWS best practices is not to use the Root Account except for a minimal set of operations that require it, like setting up an IAM account.
So when you create your root account and log in, you arrive at the AWS Management Console home, it’s the GUI for AWS.
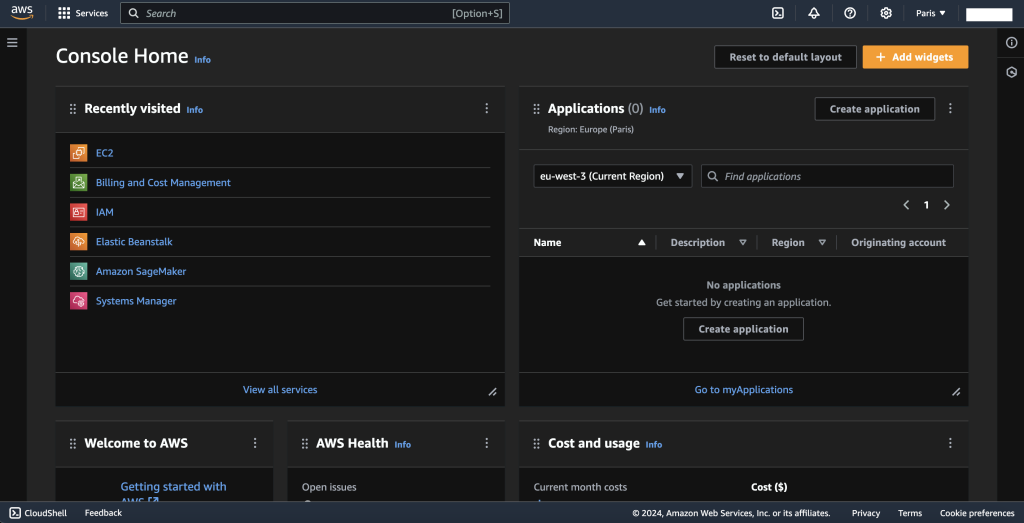
The redacted upper right part of my screenshot should be showing your root account’s name. One way to know if you’re on your root account or not is by not having a sign-in URL information when you click on that name. If it’s there, then you’re not on your root account.
We’ll create an IAM user account that we’ll use to create, configure and launch our AWS EC2 Instance. An IAM user is just an user with a set of permissions. You can group users into groups and a user can be part of many groups. A permission defines something that the user can do, for example creating an EC2 Instance. These permissions can be a very wide set of permissions, acting as an administrator, almost like a root account, or they can be very limiting. We call a set of permissions a policy.
As I said, you can put users into groups, and it becomes apparent that you can define group policies from which the group users will inherit directly instead. If you want to give the right to create, configure and launch EC2 Instances to different users then instead of giving them individual set of permissions, which is called inline policies, it’s better to group them into a group and have them inherit its policy. This allows you to manage your users more efficiently.
So now write in the search bar “IAM” and go to it. By the way, IAM is a global service, you’ll notice that near your name, while other services like EC2 are not. This means that whatever region you choose, the IAM UI is the same. On the home page for the IAM service, click on “Create User”.
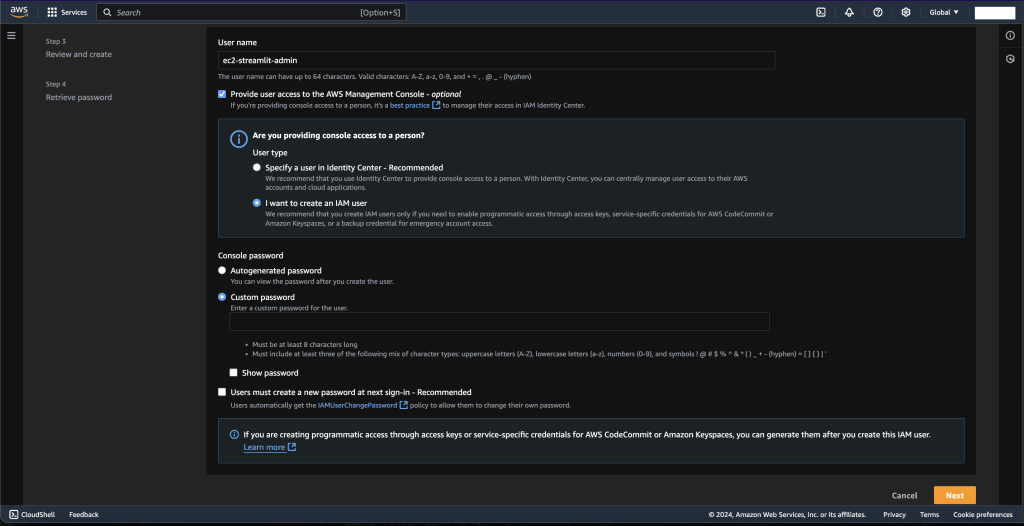
Give your user an appropriate name, mine will be ec2-streamlit-admin, enable the access to the AWS Management Console, it’s going to be easier when you’re that user. Since I am that user, I’ll be using a custom password and I don’t want to change it when I’ll sign in. Click on “Next”.
Now you’re prompted to set the permissions, we’ll be adding the user to a group, so click on “Create group”.
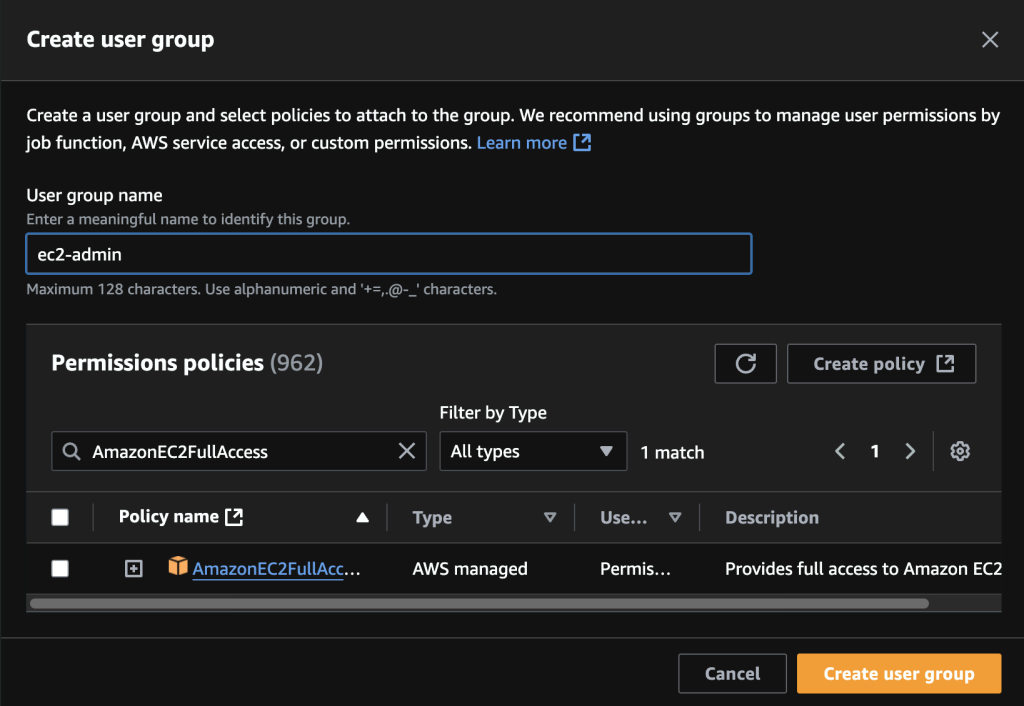
Give your user group an appropriate name, mine will be ec2-admin because I want this user to be able to do a wide variety of tasks relating to EC2. Choose your policy as well. On AWS (or any other field in life where security is of value) there is a principle of least privilege, which means you give a user or a group just the right permissions for them to accomplish their tasks and nothing more. Since I want my user to be an administrator of some sort on EC2 instances, I’ll be choosing the AmazonEC2FullAccess policy. Create the user group and attach your user to it.
Review and validate the creation of your user.
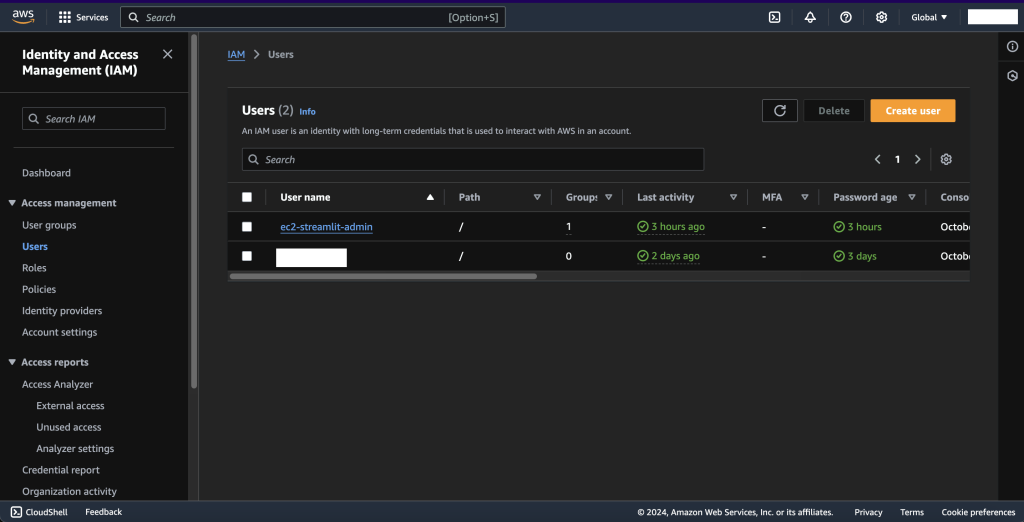
When you create the user you get a sign-url that you can use to go directly to the sign in interface for that user. Pretty handy! And if you connect with that user account you’ll notice the sign in URL in the top right corner when clicking on your name, under the account ID.
Every EC2 operation that we’ll be doing, we’ll be doing with this freshly create account.
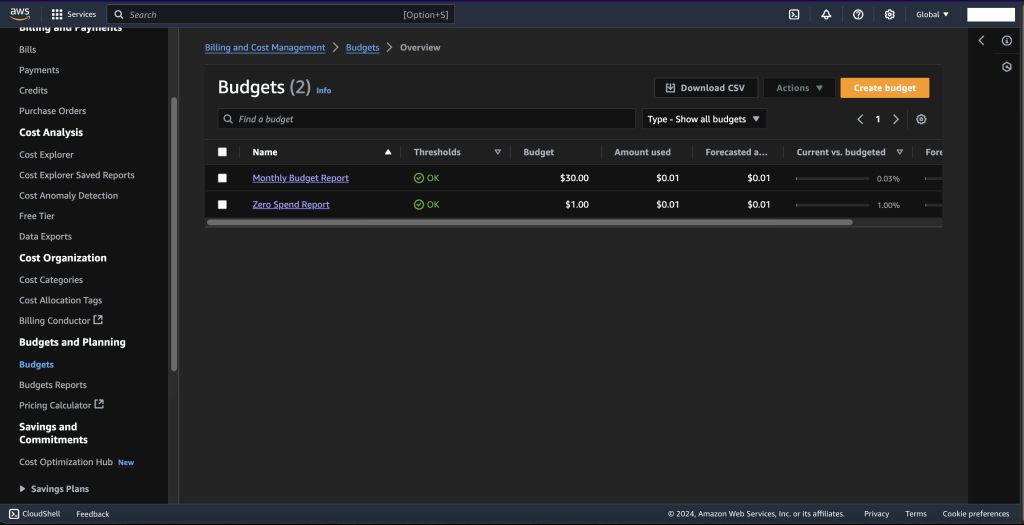
Budgets
But before that, let’s set up some billing reports. Billing and Cost Management, and go to “Budgets”, and click on “Create Budget”. Use a template and select the Zero spend budget, this will alert you when you have to pay one cent. Put in your email. You can forget about it if you don’t want, but I like to know when I’ll start bleeding. The important one is the Monthly cost budget, put in your monthly budget, as it is displayed, “you will be notified when 1) your actual spend reaches 85% 2) your actual spend reaches 100% 3) if your forecasted spend is expected to reach 100%”, which is cool. You can turn off these thresholds if you go to the “Budgets” tab.
Now we can log out of the root account and sign in as the IAM user we created earlier, mine is ec2-streamlit-admin.
EC2 Instance, Key Pair, Security Groups
EC2
EC2 means Elastic Compute Cloud, it’s an IaaS (Infrastructure as a Service) offering that allows you to rent virtual machines (the EC2 instances), to store data on virtual drives (Elastic Block Storage, EBS) while also offering the possibility to distribute load across machines (Elastic Load Balancing, ELB) and to auto-scale (Auto Scaling Groups, ASG).
There are different EC2 Instance offerings, but all of them allow you to choose at least the operating system, the compute (CPU) and memory (RAM) capabilities, the storage, different network configurations and allow you to provide a boot script (a script that’s ran after an EC2 is launched) called User Data.
The combination of compute, memory, network, storage and its bandwidth is commonly grouped under an EC2 Instance Type.
Now type in the search bar “EC2” to get into the EC2 service. The EC2 service is not global, so make sure to switch to a more appropriate region if it’s not already the case.
Key Pair
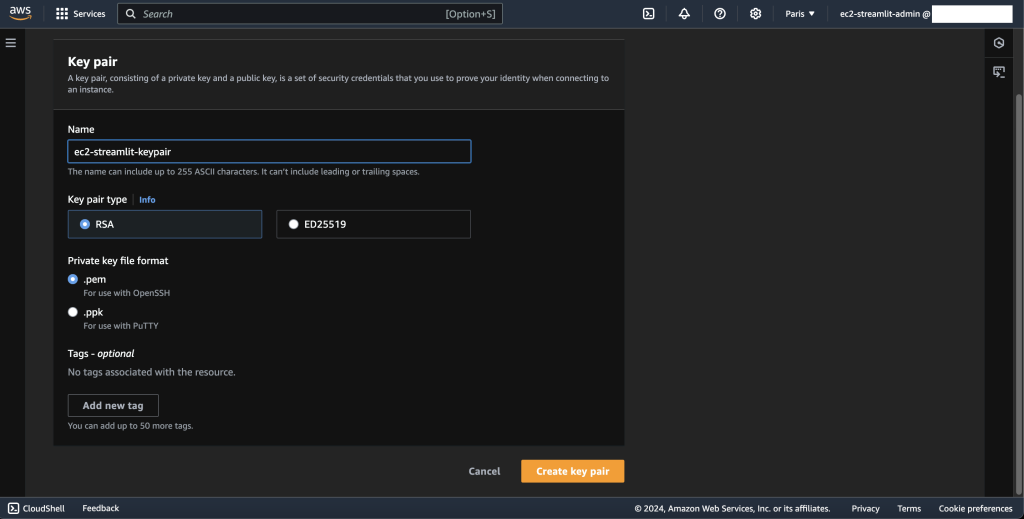
Before we launch an instance, let’s create a key pair.
Under “Network & Security” click on “Key Pairs”, this will allow us to create an SSH key pair to log into our EC2 Instance later on.
So click on “Crete key pair”, I’ll call it ec2-streamlit-keypair. Choose a .pem format if you’re on Linux/MacOS/Windows 10.
At the moment you can lose the key file with no consequences, you can recreate another, but once you tie the key to an EC2 Instance, better not lose the key file.
Security Groups
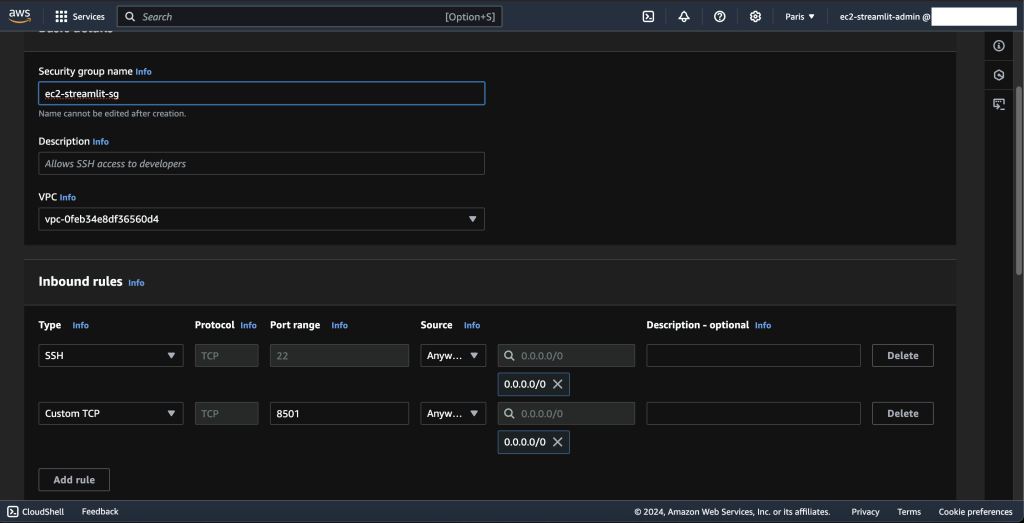
We have one last thing to configure before creating our EC2 Instance, it’s the security groups.
We don’t have to do it right now because security groups are independent from your EC2 Instance, they’re firewall rules that are applied on top of your EC2 Instance. This is why you can easily remove and add security groups to a running EC2 Instance.
If you ever run into a timeout when trying to reach your EC2 Instance, it most probably is a security group issue.
With security groups you can only allow traffic from or to somewhere. A security group has a type (protocol to open to network traffic), a protocol (TCP or UDP), a port range (the ports allowing that type of traffic to flow through) and a source (an IP range).
You can have security groups for inbound traffic and for outbound traffic. You can also reference other security groups in yours, that way you don’t require the IP address to configure your security group.
Under “Network & Security” click on “Security Groups” then “Create a security group”. I’m going to name it ec2-streamlit-sg. Add some description. And under “Inbound Rules” I’m going to add an SSH rule from anywhere, this way I can SSH into my EC2 Instance from anywhere.
More importantly, I’m going to add a Custom TCP rule, allowing traffic from anywhere on port 8501. This is the port used by Streamlit! We’ll remove this, or rather replace it by HTTP or HTTPS later on when we’ll set up nginx.
I’ll add an outbound rule to allow all kind of traffic to anywhere, that why I can download whatever is necessary to run my Streamlit app (git, the repo etc.).
EC2 Instance Launching
We’re set and ready to launch an EC2 Instance. Go to “Instance”, and click on “Launch instances”.
I’ll name my instance Inflacon, which is the name of my project. My choices moving forward are motivated by the free tier. So I’ll choose the Amazon Linux 2023 AMI as my operating system. An AMI as it is said on the website is an Amazon Machine Image, it’s just an image of an operating system.
So the instance type we’re going with is a t2.micro. I’m going to select my ec2-streamlit-keypair, then select the ec2-streamlit-sg that I created.
I’ll keep the storage as it is, which an 8GB EBS Volume (Elastic Block Storage), if you open the “Advanced” part and roll down the details for “Volume 1 (AMI Root)” which is the root volume that your EC2 Instance will come with, we can check that it’s set to be deleted on termination. This means that when we terminate this EC2 Instance, which is the equivalent of deleting it, not when we stop it, the volume is going to be deleted as well. Since I don’t need it if I ever terminate my EC2 Instance and I might forget it, I’ll let it as it is.
You can also add a new volume if you want more storage, in this case I’ll advise you to check the EC2 storage options.
Now we get to the juicier part, the User Data script.
User Data
At the moment, we need our User Data to do this:
- Update the packages installed in the AMI (optional)
- Install git to clone my repo (can be done later on but I prefer to do it here as the root user)
- Create a user to follow the best practices on security purposes, and for which I’ll install most of the stuff needed.
- As that user:
- Install the uv Python package and project manager.
- Clone my repo
- As my root user, configure the Streamlit service.
My User Data script is thus:
#!/bin/bash
dnf update -y
dnf install -y git

useradd -m -s /bin/bash inflaconuser

sudo -i -u inflaconuser bash << EOF
cd ~
curl -LsSf https://astral.sh/uv/install.sh | sh
echo 'export PATH=\$HOME/.local/bin:\$PATH' >> ~/.bashrc
source ~/.bashrc
git clone https://github.com/ReinforcedKnowledge/inflacon.git
EOF

cat > /etc/systemd/system/streamlit.service << EOL
[Unit]
Description=Streamlit Inflacon App
After=network.target

[Service]
User=inflaconuser
WorkingDirectory=/home/inflaconuser/inflacon
Environment=PATH=/home/inflaconuser/.cargo/bin:/home/inflaconuser/.local/bin:/usr/local/bin:/usr/bin:/bin
ExecStart=/home/inflaconuser/.cargo/bin/uv run streamlit run Calculateur.py --server.address 0.0.0.0
Restart=always

[Install]
WantedBy=multi-user.target
EOL

systemctl daemon-reload
systemctl enable streamlit.service
systemctl start streamlit.service
Remember to tune this script for your own needs. If you’re using pip then you’ll have to create a virtual environment and install the requirements of your project etc.
Since I’m using uv, then doing uv run streamlit run Calculateur.py for the first time will install the Python version if it’s not already in the AMI, create the virtual environment, install the dependencies and activate it before running streamlit run Calculateur.py in it. My next article is going to cover uv so stay tuned!
Also pay attention to the path of your binaries, uv is installed in ~/.cargo/bin and since I installed it as inflaconuser then the absolute path is /home/inflaconuser/.cargo/bin. I think you can do it with the relative path, but this way we avoid any issues. I think it’s also recommended to put the absolute path instead of Calculateur.py.
If you decide to change the port of your streamlit app, by doing --server.port, don’t forget to change the inbound rule for your security group as well. The same goes if you want to allow incoming traffic from one range of IP addresses, don’t forget to change that in --server.address.
Launch the instance. When you click on your instance, you’ll see a public IP address. Go to <public-ip-address>:8501 and you should land on your app.
Associate a domain name
Domain configuration
We’ll suppose that you have correctly configured your DNS record and the SSL certificates. If you need any guidance on that don’t hesitate to leave a comment here.
nginx setup
SSH into an EC2 Instance
Let’s first SSH into your EC2 Instance, you remember where your .pem file is? Good.
Before you can SSH into your EC2 Instance, you’ll have to change its permissions to a read-only by you only. So you can do chmod 400 <path-to-your-key><key-file.pem>.
Now, you can use it to SSH into the EC2 Instance. EC2 Instances come with a default user, ec2-user. So you can do ssh -i <path-to-your-key><key-file.pem> ec2-user@<your-ec2-public-ip-address>.
If it’s the first time you’re SSHing into this EC2 Instance, the system won’t recognize the server’s identity and will ask you to verify it. Go on and enter yes. This will store the server’s fingerprint to your list of known hosts in your local SSH configuration for future connections. You can also choose the fingerprint option which is a security option to verify that the signature you’ll type is what the server claims the signature is.
Install & configure nginx
First we’re going to install sudo dnf install -y nginx. (The ec2-user has root privileges), start it sudo systemctl start nginx, and enable it sudo systemctl enable nginx.
Now, let’s just remove the default nginx configuration in case there is one sudo rm /etc/nginx/conf.d/default.conf. I don’t think it can cause an issue but you never know. And create a new configuration to set up nginx for your domain, sudo nano /etc/nginx/conf.d/inflacon.conf. Here instead of inflacon, use your domain name, not your domain name .com, just your domain name. This is how you can configure it:
server {
    listen 80;
    server_name inflacon.com www.inflacon.com;

    location / {
        proxy_pass http://127.0.0.1:8501;
        proxy_set_header Host $host;
        proxy_set_header X-Real-IP $remote_addr;
        proxy_set_header X-Forwarded-For $proxy_add_x_forwarded_for;
        proxy_set_header X-Forwarded-Proto $scheme;

        proxy_http_version 1.1;
        proxy_set_header Upgrade $http_upgrade;
        proxy_set_header Connection "upgrade";

        proxy_buffer_size 128k;
        proxy_buffers 4 256k;
        proxy_busy_buffers_size 256k;
        proxy_max_temp_file_size 0;
    }
}
Don’t hesitate to change the port or adapt the configuration to your needs. This is just a basic nginx configuration.
You can test your configuration with sudo nginx -t.
Now reload the service, sudo systemctl reload nginx.
If you’re setting up your own certificates with certbot or something, don’t forget to add them in the configuration. For me, I’m just going to use a flexible SSL certificates from Cloudflare.
Reconfigure Streamlit service
Because now we have set up nginx, which is a reverse proxy, let’s not expose our app to the internet anymore. nginx will redirect the traffic to it.
Let’s re-configure our Streamlit service, sudo nano /etc/systemd/system/streamlit.service:
[Unit]
Description=Streamlit Inflacon App
After=network.target

[Service]
User=inflaconuser
WorkingDirectory=/home/inflaconuser/inflacon
Environment=PATH=/home/inflaconuser/.cargo/bin:/home/inflaconuser/.local/bin:/usr/local/bin:/usr/bin:/bin
ExecStart=/home/inflaconuser/.cargo/bin/uv run streamlit run Calculateur.py --server.address 127.0.0.1 --server.port 8501
Restart=always

[Install]
WantedBy=multi-user.target
We just changed the --server.address 127.0.0.1 and added the --server.port. This effectively makes our application only accept traffic from the same machine (127.0.0.1 and it’s still a Streamlit app so it still listens on port 8501).
nginx being a reverse proxy, it acts as an intermediary between our Streamlit app and the rest of the world.
With my configuration nginx is set up to handle incoming HTTP requests on port 80, which aligns with Cloudflare’s forwarding behavior in Flexible SSL mode. It’s Cloudflare who handles the SSL termination and it forwards a decrypted HTTP request to the nginx server on port 80 (which in turn forwards it to the Streamlit app).
Again, you have full SSL certificates or using certbot don’t forget to adapt the configuration. The port for HTTPS requests is 443.
And just as before, restart the service, sudo systemctl restart streamlit.service.
We can verify that both services are running correctly by doing sudo systemctl status streamlit.service and sudo systemctl status nginx.
Change the security group’s rules
We don’t need the inbound rule that allows traffic from anywhere on 8501. We’re going to remove it and add both HTTP and HTTPS inbound rules from anywhere.
We can keep the outbound rule for the moment as well. I don’t want to bother if I have to pull some new changes in the repo.
Now you can go on your website and you’ll see your app running! Mine is here: https://inflacon.com/
Congrats!
Micro-bits to help you troubleshoot
- If you are unable to reach your site (timeout), it’s probably due to security group. Check that you have the correct inbound traffic rules. And if your app does need to reach the outside, verify the outbound traffic rules as well.
- Verify your
nginxconfiguration and especially how you handle SSL certificates. - You can access your user with
sudo su - username. You can verify that you have correctly pulled in the repository for example by doinglsthere. (I made the mistake of not pulling the correct repo once) - If there is any issue with your instance you can check
/var/log/cloud-init.logwhich logs every action that cloud-init performs during the bootstrapping of the instance, some configuration settings and the steps from the User Data script as well, and/var/log/cloud-init-output.logwhich shows the output of cloud-init and User Data script (cloud-initautomatically capturesstdoutandstderrfrom the User Data script). I’m not going to delve into these logs files, it might be the subject of a future article, but to know if there is an error with executing your User Data script look foruser-datain/var/log/cloud-init.log, for example withgrep -i "user-data" /var/log/cloud-init.log. If everything went well you should see "
handlers.py[DEBUG]: finish: init-network/consume-user-data: SUCCESS: reading and applying user-data". - If executing
sudo systemctl is-active streamlit.serviceshows failed then you can read the following paragraphs to understand a bit more about what we were doing and why.
Daemon, systemd and systemctl
Since we’re using Streamlit as a systemd service, it can be helpful to have basic notions of what that is.
So systemd is a “software suite […] Its primary component is a “system and service manager” — an init system used to bootstrap user space and manage user processes.” The “d” in systemd stands for daemon. You can think of systemd as a system that initializes the system, its processes and manages them. There is a huge array of responsibilities that fall under the umbrella of initialization and management but we’re not going to get into that.
What is a daemon? A daemon is a background process. It runs continuously, it’s not tied to the user. So systemd is a daemon that manages other daemons.
What about systemctl? It’s “a command to introspect and control the state of the systemd system and service manager”. The “ctl” in systemctl stands for control.
Some common systemctl commands are start, stop, status to start, stop and check the status of a systemd service. And enable, disable to enable or disable the start of the systemd service automatically at boot.
I guess now you understand why we made our Streamlit app into a systemd service. A systemd service is just a daemon managed by systemd.
Though systemd is very powerful and can do a lot of things like dependency management to ensure proper startup order for services that depend on each other, logging, resource control etc. etc. Our main goal of making the Streamlit app as a systemd service is to have it as a long-running background process with an easily managed lifecycle (start, stop, restart, reload etc.).
We use unit files to define and configure our services that will be managed by systemd.
Unit files typically end with .service. There are system-wide unit files that are found at /lib/systemd/system which are provided by packages. You can do in your EC2 Instance ls /lib/systemd/system | grep nginx. You’ll see the nginx.service.
You’ll also see a .service.d which is a drop-in configuration directory that allows to extend the behavior of the .service without modifying the original unit file.
There are other system-wide unit files found at /etc/systemd/system, it encompasses overrides and custom unit files, thus why we put our streamlit.service there.
Then there are user-specific unit files at ~/.config/systemd/user/.
You can check the unit file of a service by doing sudo systemctl cat <serivce-name>.
Finally, you can check if a service is active or enable with is-active and is-enabled.
Future Improvements
I’d like in the future to have a script that will automatically set up a Streamlit app on a domain name instead of having to SSH into it after setting it up initially with a public IP address. This might require a combination of Elastic IP address and delaying the nginx configuration only after the Elastic IP address is correctly tied to the EC2 Instance.
Set up a way to automatically update the repo. For the moment I have to SSH into the EC2 Instance, activate the inflacon user, pull the new code, exit, restart the streamlit service. There might be a way to do that directly, like when new code is pushed to main, then automatically it’s pulled in the repo here as well or something, maybe using a webhook that triggers a script to pull the new code from the repo whenever changes are pushed to it. Or have some kind of cron job that will pull the new code every night or something.
There are other things that don’t really make sense for my use case but could be good for practice, which are logging and monitoring, containerization and scaling. But this won’t be needed for an app that’s not going to be used (I think) and goes beyond what I wanted to do initially, which is just to get a hands-on experience with EC2 Instance and deploy a Streamlit app on it, with a domain name.
Comments
Comments will appear here once Giscus is configured.
2 comments (archived)
These comments were migrated from the original WordPress site. New comments are via Giscus below.
Naaaaadi a ssaaat
Hahaha l3zzz